Why?
I live in a country with heavy internet censorship. This means that to access the free internet, everyone in the home network has to turn on some sort of proxy. This comes with a hefty cost of extra load on any device in our home, whether it is:
-
Extra stress on mobile batteries: constantly running VPN profiles on mobile phones make them run hotter and significantly impacts their battery life.
-
Poor proxy apps on different platforms: There is numerous amount of headaches that follow with mobile proxy apps. Some don’t work properly, some are bloated, some are too heavy on the device.
-
Compatibility: Some devices like Android TVs don’t support certain GFW-resistent protocols.
How it all started
This initially started with me installing Debian on an old PC lying around at the back of my bed. I was just goofing around, and I wanted to have a working home GNU/Linux server. Debian is great for servers. It installed gracefully with no headaches and was ready to go in less than 15 minutes. I always wanted to make the whole process of connecting family members to the free internet easier.
So, here I started my journey of looking for a solution.

First configuration: clumsy redsocks + iptables setup
If I want to be honest, I initially just asked ChatGPT on what I wanted to achieve, surprisingly it led me to the right path. I was presented with a tool called redsocks. My knowledge on the networking behind this tool is not enough yet, but I am guessing that it essentially translates the TCP connections made by devices to SOCKS/HTTP proxy.
This is exactly what I needed. Most of the GFW-resistent proxy protocols usually run a SOCKS/HTTP proxy on your local machine that you can use it to route your traffic through it. So you might ask:
Why don’t you just run the SOCKS/HTTP proxy on the machine and call it a day?
Well, there are two reason behind this:
-
I am just too geeky, and sometimes I have to do something for no logical reason. (Maybe you can call this OCD too)
-
Most of the devices don’t provide a good experience when you set a SOCKS/HTTP proxy on them for some reason. And some don’t even support them at all.
-
This would still put extra stress on mobile batteries and moreover, extra hassle on the users.
I don’t really know 100% what is going behind the curtains in this process, so I essentially had to try out different combinations of config files to find the working solution.
Here is the redsocks configuration:
base {
	// debug: connection progress & client list on SIGUSR1
	log_debug = on;

	// info: start and end of client session
	log_info = on;

	/* possible `log' values are:
	 *   stderr
	 *   "file:/path/to/file"
	 *   syslog:FACILITY  facility is any of "daemon", "local0"..."local7"
	 */
	log = "syslog:daemon";

	// detach from console
	daemon = on;

	/* Change uid, gid and root directory, these options require root
	 * privilegies on startup.
	 * Note, your chroot may requre /etc/localtime if you write log to syslog.
	 * Log is opened before chroot & uid changing.
	 */
	user = redsocks;
	group = redsocks;
	// chroot = "/var/chroot";

	/* possible `redirector' values are:
	 *   iptables   - for Linux
	 *   ipf        - for FreeBSD
	 *   pf         - for OpenBSD
	 *   generic    - some generic redirector that MAY work
	 */
	redirector = iptables;
}

redsocks {
	/* `local_ip' defaults to 127.0.0.1 for security reasons,
	 * use 0.0.0.0 if you want to listen on every interface.
	 * `local_*' are used as port to redirect to.
	 */
	local_ip = 0.0.0.0;
	local_port = 12345;

	// `ip' and `port' are IP and tcp-port of proxy-server
	// You can also use hostname instead of IP, only one (random)
	// address of multihomed host will be used.
	ip = 127.0.0.1;
	port = 2334;


	// known types: socks4, socks5, http-connect, http-relay
	type = socks5;
}
This will basically redirect any TCP connection that goes to the port
12345 on this machine to the SOCKS server 127.0.0.1:2334. So you will
have to have your proxy server running on 127.0.0.1:2334.
Now that we have the redsocks configuration, we need to set up the iptables rules so that the traffic that comes to the machine is redirected to the redsocks.
iptables -I INPUT -j ACCEPT
iptables -A FORWARD -i wls32 -j ACCEPT

iptables -t nat -A OUTPUT -d 192.168.0.0/16 -j RETURN
iptables -t nat -A OUTPUT -d 0.0.0.0/8 -j RETURN

#iptables -t nat -A PREROUTING -p tcp --dport 22 -j ACCEPT
#iptables -t nat -A OUTPUT -p tcp --dport 22 -j ACCEPT

#iptables -t nat -A PREROUTING -p tcp ! --dport 22 -j REDIRECT --to-ports 12345
#iptables -t nat -A OUTPUT -p tcp ! --dport 22 -j REDIRECT --to-ports 12345
#iptables -t nat -A PREROUTING -p udp ! --dport 22 -j REDIRECT --to-ports 10053
#iptables -t nat -A OUTPUT -p udp ! --dport 22 -j REDIRECT --to-ports 10053

iptables -t nat -A PREROUTING -p tcp --dport 443 -j REDIRECT --to-ports 12345
iptables -t nat -A OUTPUT -p tcp --dport 443 -j REDIRECT --to-ports 12345
iptables -t nat -A PREROUTING -p tcp --dport 80 -j REDIRECT --to-ports 12345
iptables -t nat -A OUTPUT -p tcp --dport 80 -j REDIRECT --to-ports 12345
iptables -t nat -A OUTPUT -p udp --dport 53 -j REDIRECT --to-ports 6450
iptables -t nat -A PREROUTING -p udp --dport 53 -j REDIRECT --to-ports 6450

#iptables -t nat -A PREROUTING -p tcp -j REDIRECT --to-ports 12345
#iptables -t nat -A OUTPUT -p tcp -j REDIRECT --to-ports 12345
iptables -t nat -A POSTROUTING -p tcp -o wls32 -j MASQUERADE
This will basically redirect any TCP connection that goes to the port
80 or 443 to the port 12345 which is the port that redsocks is listening.
Pay attention to the comments in the script, I just wanted to leave them here
to show how I was pulling my hair out while trying to figure out the correct
configuration.
One of the main issues with this setup was that for some reason devices connected
to this machine as a gateway were not able to do DNS queries. I just randomly
tried out routing the DNS queries (port 53) from the devices to the port 6450 which is
the DNS server that Hiddify-next runs. Which
Also, for some reason I had to specify the exact port I wanted to redirect and
it wouldn’t work if I just redirected all the traffic to the port 12345.
I would appreciate it if someone could explain to me why this is the case. Don’t hesitate to reach out to me via email.
Lastly I had to specify that the devices use this machine as a gateway. This can be done by setting the gateway IP to the IP of the machine. You can either specify the DHCP server to give the IP of the machine as the gateway or you can manually set the gateway IP on the devices.
Now, this setup was working, but it was not the most elegant solution. Sometimes this setup would just stop working and I had to restart the machine to make it work and since I didn’t have much knowledge on networking. This didn’t satisfy my OCD.
Hereby I present you the second configuration:
Second configuration: OpenWRT + Passwall
The issue with the previous configuration
Something that itched my mind the whole time was the problem of routing the traffic. I wanted to not route the traffic that is domestic to the proxy. My knowledge in routing via iptables manually was not enough and I had no clue what steps to take.
Another thing that I had in my mind for a long time was to use an OpenWRT machine for my home network but my current router did not support it and I had to purchase a new router for it.
I knew OpenWRT had an x86 version which you could run on x86 machines but since I was completely a beginner to OpenWRT, I couldn’t really risk it to run it on bare metal. So I decided to run it on a VM and what’s better than QEMU for this matter?
Setting up the QEMU VM
QEMU is a free and open-source machine emulator and we can use it to run a VM that runs OpenWRT. The benefit to this approach is that we can:
- Access our host even when we have screwed up our OpenWRT install.
- Dedicate limited amounts of resources.
Another approach might be using other approaches to virtualization like proxmax
First, I decided to manage my virtual machine using libvirtd which is a convenient open-source daemon to manage different virtual machines.
The QEMU + libvirtd installation procedure should be pretty easy, install the packages for both QEMU and libvirtd and start the corresponding services.
After this, we can use a fronted for libvirtd called virt-manager. The procedure now should be pretty easy. We just have to grab the image file from here and go through the wizard in virt-manager and set up our virtual machine.
Before anything, we should make sure that we have set up a bridge so that our VM can talk with other devices in our network. One thing I have noticed is that the QEMU host should be connected via LAN to our router to bridge the connection to the guest. I didn’t have much luck setting it up with WLAN connection.
(This section needs to be completed)
Setting up Passwall
I followed a guide like this to set up Passwall on my OpenWRT machine. Passwall is a great project that simplifies the whole process of routing the whole network through a proxy. It supports multiple projects like sing-box or Xray that help hiding your proxy traffic from DPI.
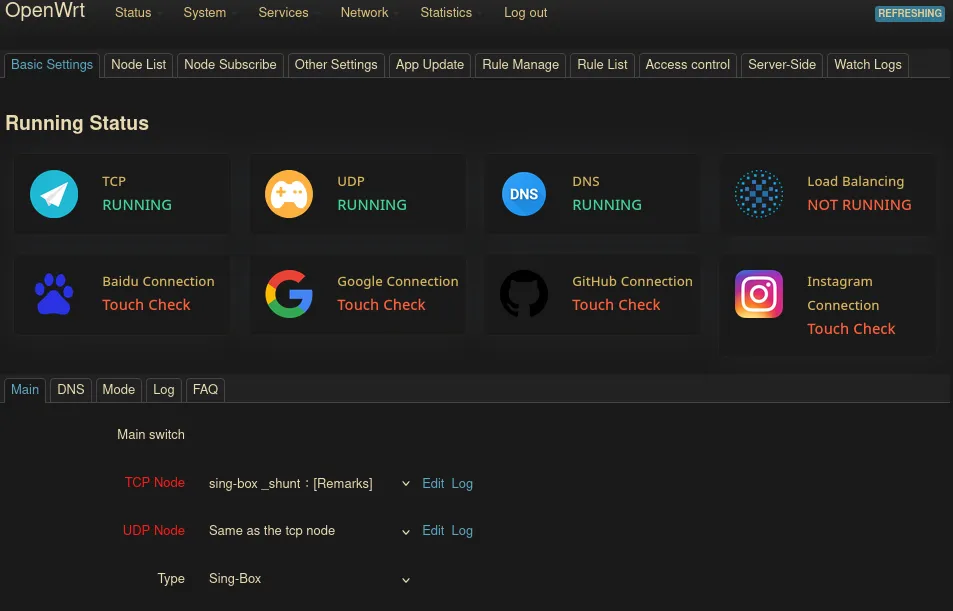
First off, it is a good idea to download the specified executables or update them if they already exist. This can be done through the App Update where we can download/update the related executables.
To add a new profile, we can go to the Node list tab where we can add profiles via link or manually. In case we want to use different profiles for different domains or IPs, we have to first add their profiles separately. More on this later.
After adding the profiles, we can simply enable the Main switch. And our internet should be tunneled through the specified proxy. After enabling the switch, The TCP and UDP cards in the main page should turn to a green text saying running. I also usually use the connection cards to see whether the proxy is working properly.

Using rules to route traffic
One of the good features that this method easily provides is routing traffic based on traffic’s domain/IP. This is mainly done by using a so-called shunt. We can specify different profiles and redirect specific traffic to its corresponding profiles. To make a shunt, we just have to create on in the Node list section. Here, by using the add button we can create a profile of type shunt (xray and sing-box shunts are supported as of now).
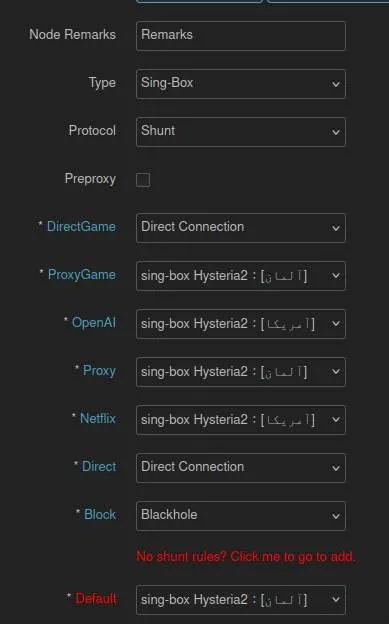 Here, I have created a sing-box shunt profile where the traffic that matches my DirectGame ruleset don’t go through
the proxy. Games that I want to go through proxy AKA ProxyGame go through a specific proxy, and other traffic goes
its specific profile. For example, ChatGPT tends to open up on a slower profile but not on another. Here, we can specify
that the traffic going to OpenAI to be sent to that specific profile. And at the end, if no matching ruleset was found
for the traffic, the traffic goes to the proxy with the lowest latency.
Here, I have created a sing-box shunt profile where the traffic that matches my DirectGame ruleset don’t go through
the proxy. Games that I want to go through proxy AKA ProxyGame go through a specific proxy, and other traffic goes
its specific profile. For example, ChatGPT tends to open up on a slower profile but not on another. Here, we can specify
that the traffic going to OpenAI to be sent to that specific profile. And at the end, if no matching ruleset was found
for the traffic, the traffic goes to the proxy with the lowest latency.
Specifying rules
In the Rule Manage section, we can set which traffic the rule should accept. For example, in the OpenAI rule, I have set the following:
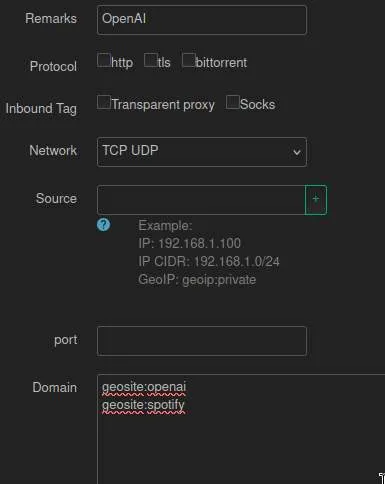
Here, I have specified that this rule accepts the traffic that goes through geosite:openai & geosite:spotify. geosite is basically a file that has categories for different types of domains. Some kind man has spent time for us to easily specify a group of domains by using a single file. Here, I have used the file’s OpenAI and Spotify category. By Specifying this, I don’t have to search for every single domain of Spotify, the kind man has done it for me before in the file.
These files are located under /usr/share/singbox for the sing-box profiles.
We can even download other files like this. For example, I have used the great Iran Hosted Domains project to bypass the proxy on domestic traffic. This
greatly helps ping, and it reduces the chances of your proxy getting detected.
the procedure should be as simple ass downloading the latest iran.dat file from the releases section
and putting it inside /usr/share/singbox. And finally, we can use it in any rule by setting
ext:iran.dat:all in the domains section.
Extra stuff
DNS Stuff
It is always a good idea to play around with the panel to see which options enhances your connection.
I personally have found it fun to play around with the DNS settings in Basic Settings > DNS. You might
want to try different settings there (i.e. UDP, TCP and so on).
Handy Clear NFTSET button
You might also find it useful at times to use the Clear NFTSET Button under the DNS section. Sometimes it might fix some weird bugs and hiccups.